How to Screenshot on Picsart: Easy Steps
Taking screenshots is an incredibly useful tool for capturing and sharing your digital creations. With the Picsart app, you have a powerful editing toolbox at your fingertips, making it easy to edit photos, create collages, draw digital artwork, and more.
One great way to showcase and utilize your Picsart creations is by saving them as screenshots. Whether you want to share on social media, save for later, or use it in other projects, screenshots make it simple to capture your edited images in Picsart.
In this comprehensive guide, we’ll walk through the easy process of taking screenshots on Picsart step-by-step. With just a couple of taps, you can save your Picsart masterpieces and access them anytime.
Let’s get started!
How to screenshot on PicsArt (Step By Step)
Step 1: Open The Image You Want to Screenshot in Picsart
The first step is to open the Picsart image or creation that you want to take a screenshot of. This could be an edited photo, a layered collage, a digital drawing, or any other project made in Picsart.
For example, if you want to share an awesome Picsart edit you did of a vacation photo, open that edited image in the Picsart app. If you want to save a collage you created, open that collage image in Picsart.
You can access images and creations directly from your device’s camera roll or gallery. Or, you may already have the image open that you want to screenshot. Having the Picsart image visible on your screen is crucial for capturing it in a screenshot.
Step 2: Locate the Screenshot Icon in Picsart
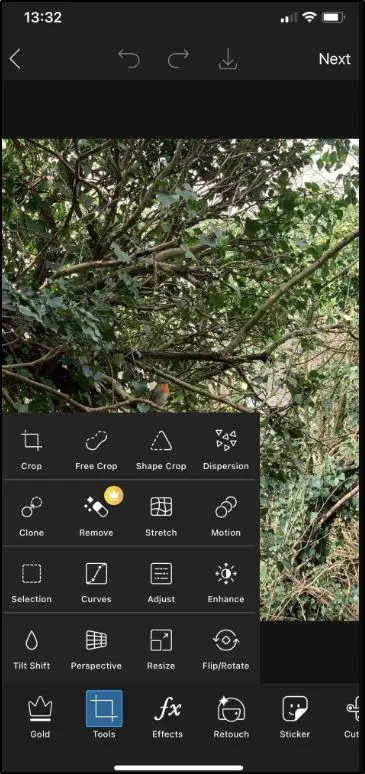
Now that you have your Picsart creation open, it’s time to take the screenshot! The screenshot icon is located in the upper right corner on iOS devices and the lower right corner on Android.
On an iPhone or iPad, you’ll see a square with an arrow icon in the top right. On Android, look for the same square icon at the bottom right. This is the screenshot button you’ll tap to instantly take a screenshot.
If you don’t see the icon immediately, you may need to tap on the image to bring up the editing tools. The screenshot button generally appears whenever editing tools are visible.
Step 3: Tap the Screenshot Icon to Capture
Here comes the fun part! All you need to do now is tap the Picsart screenshot icon to instantly capture an image of your creation.
Give the icon a single firm tap to take the screenshot. You’ll see a brief animation confirming the screenshot has processed. And just like that, your edited image or collage will be saved as a screenshot on your device!
On both iOS and Android, tapping the screenshot icon will automatically save the image to your main Camera Roll or Photos app. You don’t have to tap through anything else or confirm the screenshot. This streamlined process makes grabbing screenshots in Picsart super quick and convenient.
Step 4: Access Your Picsart Screenshots in Photos
After you tap the screenshot button, you’ll be able to access that Picsart screenshot right from your device’s main photos app.
On an iPhone, you can go directly to your Camera Roll and see the new screenshot waiting there! On an Android device, open the Photos or Gallery app and your latest Picsart screenshots will be saved.
The screenshots taken in Picsart will save just like any other standard screenshot on your device. They won’t be stored within the Picsart app itself. Your device photos storage is where you’ll find and manage all your Picsart screenshots.
Step 5 (Optional): Reopen the Screenshot in Picsart
Here’s a cool trick you can do with your Picsart screenshots! If you want to edit or enhance a screenshot further, reopen it directly in the Picsart editor.
Go to your Camera Roll or Photos app and select the Picsart screenshot. Choose the option to open it in Picsart. This will launch the Picsart editor with the screenshot image active and ready for editing.
Now you can use all of Picsart’s tools to draw, add stickers, apply filters, layer text, and anything else you want. With this technique, your screenshots become the basis for completely new Picsart creations!
Picsart Screenshot Tools and Tips
Now that you know how to take basic screenshots in Picsart, let’s go over some additional tips and tricks for capturing even better shots:
Use Scroll Capture – Scroll capture allows you to screenshot entire collages, magazine covers, and other images that extend beyond your device’s screen size. Just tap and hold the screenshot icon to activate scroll capture.
Try Video Capture – Along with screenshots, you can record a video of you editing, drawing, or creating in Picsart. Tap and hold the screenshot icon, then select “Start Recording”.
Showcase Tools/Stickers – When taking screenshots for tutorials or social posts, consider keeping editing tools, brushes, or stickers visible to showcase what you used to create the image.
Clean Up First – Before taking your screenshot, do a quick check to clear out any unnecessary editing tools or stickers in the frame. This keeps the image clean and focused.
Check Lighting – Review your image’s lighting and make any adjustments needed, like exposure and contrast, to ensure your work is shown clearly and accurately in the screenshot.
Enhance Visually – Many use Picsart screenshots for social posts, graphics, and other visual content. Consider brightening, texturing, framing, etc. to make your image pop.
Save Different Versions – Change up your edit and take multiple screenshots showcasing the image in different styles. This gives you options to choose the best one later.
Using Picsart Screenshots
Now that you’re a pro at taking screenshots in Picsart, let’s look at all the different ways you can use those screenshots:
Social Media Posts – Picsart screenshots make awesome social content! Share your creations on Instagram, Facebook, Twitter, TikTok, blogs, and other platforms.
Text Message Sharing – Easily share your Picsart edits and collages with friends and family using SMS text messaging or apps like WhatsApp.
Profile Pictures – Screenshot profile pictures made in Picsart to share your style and brand on social profiles, messaging platforms, forums, and more.
Desktop Wallpapers – Turn your art and edits into desktop or phone wallpapers by saving Picsart screenshots and applying them as background images.
Print Photos – Printing your Picsart screenshots lets you turn them into real-world art for your wall, gifts, memorabilia, etc.
Project Inspiration – Save and collect screenshots of your Picsart creations to review and pull inspiration from for future projects.
Tutorials/How-Tos – Use screenshots to create stunning graphics and visuals explaining how you made an edit, collage, drawing, etc. in a step-by-step tutorial.
Marketing Materials – Incorporate Picsart designs into marketing graphics, ads, flyers, banners, email headers, website images, and other branded visuals.
Sell Merchandise – Add your Picsart creations to t-shirts, phone cases, notebooks, mugs, prints, and other customizable merchandise to sell online or in person.
As you can see, the options are endless when it comes to leveraging your awesome Picsart screenshots!
Screenshot File Types
When you take screenshots in Picsart on a mobile device, they will save automatically in either JPG or PNG file format.
JPG is the most common image file type, offering compression to reduce file size while maintaining decent image quality. JPG files are great for sharing online and digitally.
PNG is a high quality file type that preserves transparency/opacity and allows lossless compression. PNG files maintain all image details but result in larger file sizes. They are best for printing graphics, logos, and visuals requiring precision.
Picsart screenshots taken on iOS devices are saved natively in JPG format by default. To get PNG files, you simply need to activate the “Save as PNG” toggle in Picsart’s Settings. Android captures screenshots as PNG automatically.
The best file format depends on your specific needs. But the great news is Picsart screenshots provide you with that versatile choice between JPG and PNG!
How Screenshots Differ Across Mobile Platforms
Let’s take a quick look at how the Picsart screenshot process differs ever so slightly between Android and iOS devices:
On Android:
- The screenshot icon is in the bottom right corner.
- Screenshots save automatically as PNG files.
- Can also activate JPG saving in Settings.
- Motion shots capture short animated GIFs.
On iOS:
- Screenshot icon in the top right corner.
- Screenshots save automatically as JPG files .
- Can also switch to PNG saving in Settings.
- Can take still screenshots only (no GIF capture).
While screenshots work very similarly on both platforms, these are some helpful differences to keep in mind! The steps are virtually identical, but the icon position, file type defaults, and motion options vary.
Troubleshooting Picsart Screenshots
Taking screenshots in Picsart is typically quick, seamless, and trouble-free. But in rare instances, you may run into issues getting your screenshots to save properly. Here are some troubleshooting tips:
Update App – Make sure you’re running the latest version of Picsart. Updates sometimes address bugs affecting screenshots.
Restart Device – Completely closing all apps and restarting your mobile device can clear up temporary glitches.
Clear App Cache – Wipe the cache and data for Picsart to refresh the app if screenshots are not saving right.
Use Different App – As a test, attempt screenshots in a different app on your device. If those work normally, the issue is isolated to Picsart.
Check Storage – Ensure your device has sufficient storage space for saving new screenshots taken in Picsart and other apps.
Contact Support – If no other troubleshooting suggestions work, contact Picsart’s customer support for additional help resolving your screenshot problem.
Following these tips should get screenshot capturing working again in most cases. But if challenges persist, don’t hesitate to reach out to the Picsart support team for assistance getting the issue resolved.
Conclusion
Capturing amazing screenshots in Picsart is quick, easy, and incredibly useful. With just the tap of a button, you can save your Picsart creations for sharing anywhere or using in future editing projects.
Remember, open the image you want to screenshot, tap the screenshot icon located at the top right (iOS) or bottom right (Android), and the image will automatically save to your photos. That’s all there is to it!
We also covered how to reuse your screenshots by reopening them in Picsart, creative ways to utilize your screenshots across social media and other platforms, differences in saving screenshots on iOS vs Android, troubleshooting tips, and answers to frequently asked questions.
So boost your visual content and unleash your creativity using Picsart’s versatile screenshot tool. Enjoy capturing your brilliant Picsart images, edits, drawings, and collages to showcase and share with the world. Screenshot your way to social media stardom and envy-inducing artistic profile pictures!
FAQs About Picsart Screenshots
Here are answers to some of the most frequently asked questions about taking screenshots on Picsart:
How do I take a long screenshot on Picsart?
Use PicsArt’s scroll capture feature to take extended screenshots. Tap and hold the screenshot icon, then tap “Start Scrolling” to capture content beyond your screen’s length.
Does Picsart have a built-in screen recorder?
Yes! Tap and hold the screenshot button and select “Start Recording” to record video of your editing process. You can enable microphone audio too.
Do Picsart screenshots save to my Photos app?
Picsart screenshots automatically save to your main Camera Roll on iOS or Photos/Gallery app on Android. They do not save within Picsart.
Can I edit a screenshot after taking it?
Absolutely! Just reopen your Picsart screenshot in the Picsart editor to apply filters, stickers, text, and more editing options.
How can I share a Picsart screenshot?
You can share your screenshots just like any photo – text it to friends, post on social media, set as a wallpaper, add to a collage, print it, and anything else you want.
What should I do if my Picsart screenshot is blank?
A blank screenshot usually means Picsart didn’t have permission to capture images. Enable screenshot permissions for Picsart in your device settings.
Does screenshot quality decrease?
Picsart screenshots maintain full quality of your creations when saving in PNG format. JPG has minor quality reduction but still captures excellent detail.
Can I edit screenshots before saving?
Unfortunately no, Picsart does not allow pre-editing screenshots within the app before capturing. You’ll need to edit the image first, then screenshot the final result.
Is there a way to batch capture screenshots?
Picsart doesn’t currently have a batch screenshot feature. You have to take screenshots one at a time for each individual image/creation.